


Post by Mandinga on Aug 7, 2005 21:17:55 GMT -5
Since there have been lots of questions in the past and since JMC and I can't agree more on the need of accurate concept art. People are skeptical about why can't you just model. I'll clarify by running everyone through the procees of creating a character. Hopefully this will kill and false myths and inform anyone who may want to help or simply learn. All Concepts and characters are the legal property of me (Miguel Oubina).
Any one that may want to apply for conept artist, please follow these guide lines as we really need more. You may also use this thread to apply or email JMC.
This is an informative presentation not an exact tutorial. Comments and questions are appreciated and will be answered on this thread. PLEASE do not ask questions pertaning on the actuall creation of things on other threads. Thank you.
---------
All characters and Ideas begin on paper, Things will be extremely difficult and time consuming unless proper concepts are drawn. Concepts consist of direct projections of your character from the front, back and side(s) Or any other projections you may require. In this example I used a side and a back (seein as I practiced this char a lot)
69.14.48.109/01.jpg
Notice How things such as height are defned and all images line up. Lining up it one of the most important aspects of concepts. When your modeling and a pelvic area is lower on the side sketch than it is on all of the rest, things are gonna look wierd and you'll start ripping your hair out as to why. Details s must be difined as to how some accessories on a character work such as glasses, weapons or wordrobe fine points.
69.14.48.109/02.jpg
Next I'll describe the actual composition of models. Models are constructed by Lines, when lines intersect they form vertices. Vertices are kinda like your control points, you move these around to achieve the shape you want. Concepts make this a lot easier than just eye balling it.
69.14.48.109/03.jpg
Setting your images as a wall paper of your viewports in your 3d program, you move the vertices to match your drawings (amazing huh). Thats how you achieve the actuall construction of the model.
69.14.48.109/04.jpg
Next we have to get the modle ready for animation, We do this by rigging. Rigging is the process of creating a skeleton that matches your model and then Binding your geometry to follow a specific boone or link.
69.14.48.109/05.jpg
Once thats done (it's one of the most annoying and time consuming parts) We move on to Uv Mapping. Uv mapping it basically skining your character and laying it out flat. Sounds kinda psycotic but it looks like this
69.14.48.109/uv.jpg
Next we actually take this guide we just madeand toss it to photoshop or any other image app and draw our texture on it.
69.14.48.109/uvwtex.jpg
Next we export. The application is amazing and very rewarding when things look and move the way you wanted them too.
69.14.48.109/06.jpg
This process can take anywhere from 3 days to 3 weeks. depending if on project complexity. Character jobs such as this can sell anywhere from $100 to $3,000.
Feedback is greatly appreciated.


 but it sure sounds complicated. What program do you use for this?


 30 sprites though.
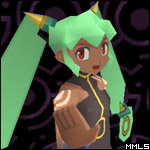
 I tried to cange Yuna's hai a bit. I think sombody said something about it being to flat.